For more such tutorials and fishy pictures, visit my website: www.playsofrays.com
LEDs are the new ‘IN’ in the lighting world and so is in our hobby where lighting is an essentially important. Be it reef, planted tanks or simple fish setups, light is needed everywhere.
We have been using CFLs, PLLs, metal halides, T5s, T8s, T12s etc for our lighting needs but after LEDs have hit the market, they seem to be the best lighting solution. Let’s have a look at some of their pros and cons -
PROS-
• Very low electricity consumption.
• Very high light output.
• Long lasting components.
• Economical in the long run.
• Very small in size.
• Latest in technology.
• The wavelength of the LED can be customized according the need by the manufacturer.
CONS-
• High initial cost.
• The cost of other components needed to make a LED light unit.
• The heat produced.
• Very fragile. Care must be taken when installing.
And as we all know, hobbyists need a single reason to start something new ;) And we have so many.
Before starting the discussion on LEDs I’d like to explain one thing. PAR - which stands for Photosynthetically Active Radiation.
We have been measuring the lights in our tanks in Watts per gallon.
Let’s just assume there are two tanks of same capacity, say 10 Gallons, but their heights are different. One is 14” in height and the other one is 9” in height. If we put the same light at the same height over both the tanks, would light reaching the bottom of the tanks be the same ??
NO… It would never be the same. So, its time we stop using WPG in our fish-talks.
Let’s discuss PAR in a little more detail now.
Light intensity can be measured in lux, which is the intensity as perceived by human eyes. Or, it can be measured in PAR units, which is the intensity as perceived by plants. PAR stands for “photosynthetically active radiation” - the radiation (light) that is used by plants for photosynthesis. The units of PAR are micromoles of photons per square meter per second. So, a PAR of 1 is one millionth of a mole of photons striking a one square meter area every second.
Don’t worry it’s not that complicated. Our eyes see the yellow and green part of the light spectrum which means our eyes are sensitive to yellows and greens. Plants are very sensitive to reds and blues, so they absorb most of the light in reds and blues, but less sensitive to yellows and greens, reflecting a lot of the light in these colors. That is why most plants look green or yellow. [We see colors because the thing we see has absorbed all the colors in the spectrum except the color we see].
How to measure the PAR! There are meters available in the market just like meters available to measure voltage, current or pH. Nowadays the light manufacturing companies are promoting their products by advertising the PAR values of their lighting products.
PAR value of any light decreases gradually as the distance from the light source increases. That means the nearer, the more PAR and the farther, the low PAR.
Now you may ask how much PAR is like 4 WPG and what PAR is like 1 WPG. We started this hobby by learning the light in WPG. It’s same as learning the difference between rupees and dollars. You know $1 is 50 Rupees but still, being an Indian your mind is not tuned according to Dollars (Happening to me right now :/). So to tell you-
10-30 micromoles of PAR- Low light
30-50 Micromoles of PAR- Medium light
50 and above- High light.
.jpg) This photo explains it very well. See the green and yellow (500-600 nm) are the lowest points. Remember, they’re not ZERO. It’s not like plants DO NOT absorb Yellows and Greens. They do but very small in comparison to Blues, Violets and Reds. Red is said to be a helping hand in growing algae. So an ideal spectrum to use in the aquarium would have low Reds, Greens, Yellows and High Blues and Violets. You can keep Reds on the high notes but then you must have good CO2 and good fertilizers to keep up the balance.
This photo explains it very well. See the green and yellow (500-600 nm) are the lowest points. Remember, they’re not ZERO. It’s not like plants DO NOT absorb Yellows and Greens. They do but very small in comparison to Blues, Violets and Reds. Red is said to be a helping hand in growing algae. So an ideal spectrum to use in the aquarium would have low Reds, Greens, Yellows and High Blues and Violets. You can keep Reds on the high notes but then you must have good CO2 and good fertilizers to keep up the balance.
LEDs are very small lights. They have a positive and a negative terminal. They are very small to solder the wires on. So the manufacturers mount the LEDs on stars. This gives it enough space to solder the wires and to put the LEDs on the heatsinks. Size of the stars is generally 20mm.
The photos will explain it to you-
This is a LED.

Now let's see how a start looks like-

And when the LED is mounted on the start it looks like-

Numbers of LED to use = The area of footprint of your tank / 22.
Let’s say your tanks is 24”x12”x14” [LxBxH] the area of the base would be- 24”x12”= 288 sq inch.
Now to calculate the no of LEDs to use- 288/22= Around 13 LEDs would be needed.
Don’t get confused between the wavelength and color temp. Wavelength is measured in nm and the temperature of light is measured in K Kelvin.
For planted tanks, generally we prefer Cool white light. But if you want to make a LED unit for your discus tank or fish only tank, Warm white would be the best choice as it gives the perfect yellowish color and accents the color of fish [Just like under our ‘Hitachi’ tube light, goldfish used to look pink ;)]
As we have discussed earlier, an ideal light’s spectrum would have low Reds, low Greens and Yellows and high of Blues and Violets.
So to mimic this ideal condition in our DIY-ed LED unit, we mix some colors with cool white. Like- Royal Blue which have the wavelength of 465nm to 485 nm.
Cree XP-E Royal Blue color parameters-

Or some Violet LEDs which have the wavelength of 410nm to 420nm.

Now let’s see the spectrum and the PAR data graph of some combinations of LEDs-
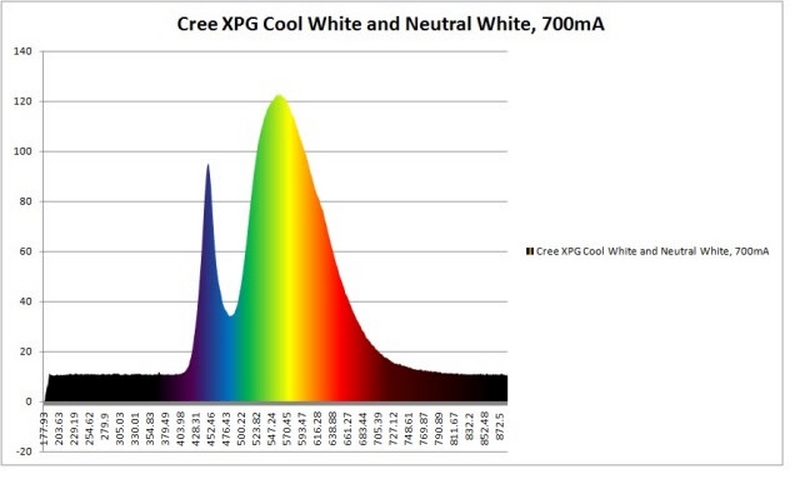
Cool White + Neutral White. As you can see the Greens, Yellows and Reds are quite high than the Blues and Violets.

Cool White + Warm White. Compared to the last combination of Cool white + Neutral White, this has much lows of Blues and Purples.

Now see the combination of Cool White + Warm White + Royal Blue. The Blues and Violets are very high and Greens, Yellows and Reds are very low.

Now guess what would be the best spectrum for your planted tank!!
Yes! You’re right. The last one, because it has low Reds, Greens and Yellows and has high Blues.
The one I’m gonna build would also have the same combination of Cool whites, Warm whites and Royal Blues.
• Heatsink
• LEDs
• LED optics
• Power supply drivers
• Fan for the heatsink (Optional)
• Dimmer/ Controller (Optional)
• Wire
• Solder cable
• Solder Iron
• Thermal Adhesive or thermal grease.
• 2 AA batteries to test the LEDs
Heatsink-
Prior to start telling you what it is, just see how it looks like-


It has a lot of fins or wings which makes its surface area way bigger than just of a solid piece or a plate of the same material. Generally Aluminum is used to make the Heatsinks. But now hard anodized heatsinks have also hit the market.
The black one shown above is hard anodized and the white one is just Aluminum heatsink.
There are 2 ways to mount LEDs on the heatsink-
Some people put fans on their heatsinks. How to know if you need a fan on your heatsink or not. Just touch your heatsink when the unit has been on since 2-3 hours. If you can touch it, you don’t need a fan. But if you can’t touch it, you need a fan.
Like- A Cree XT-E Royal Blue LED has Forward Voltage of 3.0 V, wattage of 3W and Max Drive current of 1500mA.
It means the maximum current you can give to this LED is 1500 mA and when put in a series, after every LED you’d see a drop of 3 Volts in the Voltage.
LED Optics-
Most LEDs have a light angle of 120 degrees. Which means the light would spread in a cone of 120 degrees. So to concentrate the light over an area we would need some lens or optics. Optics are named according to their concentration capabilities - 20 Degrees, 40 Degrees, 60 Degrees, 80 Degrees.
Power Supply Drivers-
LEDs work on DC current. So the drivers convert our household AC current to DC to light up the LEDs. They are characterized by their Max Drive Current and total Wattage.
For eg. Inventronics 40w driver - 700mA. Its total wattage is 40 watts so it can light up around 12 LEDs of 3W each. We leave 4 W as a margin. The 700mA is the Max Drive Current. You can use 700mA driver to light up a LED which has Max Drive Current rating of 1500mA. But you cannot use 1500mA rated driver to light up the LED with 700mA Max Drive Current.
Now, Just to talk a bit more about the drivers, lets take a new LED which is more efficient than the previous XP-G or XT-E. Cree XM-L. It has Max. drive current of 3000mA. It's upto you how much light do you want from this LED. If you put 700mA driver, it will give low light, Gradually if you increase the input current from the driver, the light output will increse. Lets see it's graph-

Dimmer/ Controller-
Just like we have controller for our ceiling fans, you may put dimmer for your LED lights. These are nothing but potentiometers. Generally we use 10 ohm dimmer.
But if you want to go fancy (which I wanna go :D) there are sunrise sunset dimmers available. You may set the time when your LEDs will start lighting up from 0% and when they would go 100% and the same of 100% to 0%. A lot of options are coming in the market nowadays.
See the one I'm gonna use here- dimmer youtube video
Wires, Solder cables, and Solder Irons-
I’ve read this information in past months from the following links and I thank them all. Specially Milad from ledgroupbuy.com, Hoppy from TPT, redfishsc from TPT, the blondskeleton from TPT.
• http://www.plantedtank.net/forums/showthread.php?t=182365
• http://www.plantedtank.net/forums/showthread.php?t=136519
• http://www.plantedtank.net/forums/showthread.php?t=184368
• https://www.youtube.com/user/ledgroupbuy
• http://makersled.com/
• http://www.ledgroupbuy.com/
• http://www.rapidled.com/
This article is written for the sole purpose of understanding LED lighting solutions for aquariums. It is based on what I have read and learnt from various sources. In case something goes differently or unxpected, I am not responsible. All the links that I have read to write this article are mentioned. All the photos are either from the internet or from the links that I've posted. They are the property of their actual awner. I've posted them here just for the information. In case something is not included, please let me know and I will include it.
Thank you for reading this. In case you see something wrong in here, please drop a comment and I'll update it.
The next blog I wrote after this blog can be found here-
Link on TPT
or
Link on Instructables.com
LEDs are the new ‘IN’ in the lighting world and so is in our hobby where lighting is an essentially important. Be it reef, planted tanks or simple fish setups, light is needed everywhere.
We have been using CFLs, PLLs, metal halides, T5s, T8s, T12s etc for our lighting needs but after LEDs have hit the market, they seem to be the best lighting solution. Let’s have a look at some of their pros and cons -
PROS-
• Very low electricity consumption.
• Very high light output.
• Long lasting components.
• Economical in the long run.
• Very small in size.
• Latest in technology.
• The wavelength of the LED can be customized according the need by the manufacturer.
CONS-
• High initial cost.
• The cost of other components needed to make a LED light unit.
• The heat produced.
• Very fragile. Care must be taken when installing.
And as we all know, hobbyists need a single reason to start something new ;) And we have so many.
PAR
Before starting the discussion on LEDs I’d like to explain one thing. PAR - which stands for Photosynthetically Active Radiation.
We have been measuring the lights in our tanks in Watts per gallon.
Let’s just assume there are two tanks of same capacity, say 10 Gallons, but their heights are different. One is 14” in height and the other one is 9” in height. If we put the same light at the same height over both the tanks, would light reaching the bottom of the tanks be the same ??
NO… It would never be the same. So, its time we stop using WPG in our fish-talks.
Let’s discuss PAR in a little more detail now.
Light intensity can be measured in lux, which is the intensity as perceived by human eyes. Or, it can be measured in PAR units, which is the intensity as perceived by plants. PAR stands for “photosynthetically active radiation” - the radiation (light) that is used by plants for photosynthesis. The units of PAR are micromoles of photons per square meter per second. So, a PAR of 1 is one millionth of a mole of photons striking a one square meter area every second.
Don’t worry it’s not that complicated. Our eyes see the yellow and green part of the light spectrum which means our eyes are sensitive to yellows and greens. Plants are very sensitive to reds and blues, so they absorb most of the light in reds and blues, but less sensitive to yellows and greens, reflecting a lot of the light in these colors. That is why most plants look green or yellow. [We see colors because the thing we see has absorbed all the colors in the spectrum except the color we see].
How to measure the PAR! There are meters available in the market just like meters available to measure voltage, current or pH. Nowadays the light manufacturing companies are promoting their products by advertising the PAR values of their lighting products.
PAR value of any light decreases gradually as the distance from the light source increases. That means the nearer, the more PAR and the farther, the low PAR.
Now you may ask how much PAR is like 4 WPG and what PAR is like 1 WPG. We started this hobby by learning the light in WPG. It’s same as learning the difference between rupees and dollars. You know $1 is 50 Rupees but still, being an Indian your mind is not tuned according to Dollars (Happening to me right now :/). So to tell you-
10-30 micromoles of PAR- Low light
30-50 Micromoles of PAR- Medium light
50 and above- High light.
.jpg)
LED
Now let’s talk about LEDs. I’m again reminding you that I am writing this at a very basic level. I won’t go deep into the semiconductor world. The info one needs to know to understand the LED lights for aquariums is all I want to write.LEDs are very small lights. They have a positive and a negative terminal. They are very small to solder the wires on. So the manufacturers mount the LEDs on stars. This gives it enough space to solder the wires and to put the LEDs on the heatsinks. Size of the stars is generally 20mm.
The photos will explain it to you-
This is a LED.

Now let's see how a start looks like-

And when the LED is mounted on the start it looks like-

This would be the final product you would be getting. This is how the LED, we now, looks.
How Many LEDs to use for my tank?
When building a LED light unit for your tank, the first question comes to your mind is- how many LEDs to use. The rule of thumb says-
Numbers of LED to use = The area of footprint of your tank / 22.
Let’s say your tanks is 24”x12”x14” [LxBxH] the area of the base would be- 24”x12”= 288 sq inch.
Now to calculate the no of LEDs to use- 288/22= Around 13 LEDs would be needed.
What colors do I need?
White LEDs come in 3 colors-- Cool White (Color Temp- 6500K),
- Neutral (Color Temp-5000K)
- Warm White (Color Temp- 3500K)
Don’t get confused between the wavelength and color temp. Wavelength is measured in nm and the temperature of light is measured in K Kelvin.
For planted tanks, generally we prefer Cool white light. But if you want to make a LED unit for your discus tank or fish only tank, Warm white would be the best choice as it gives the perfect yellowish color and accents the color of fish [Just like under our ‘Hitachi’ tube light, goldfish used to look pink ;)]
As we have discussed earlier, an ideal light’s spectrum would have low Reds, low Greens and Yellows and high of Blues and Violets.
So to mimic this ideal condition in our DIY-ed LED unit, we mix some colors with cool white. Like- Royal Blue which have the wavelength of 465nm to 485 nm.
Cree XP-E Royal Blue color parameters-

Or some Violet LEDs which have the wavelength of 410nm to 420nm.

Now let’s see the spectrum and the PAR data graph of some combinations of LEDs-
Cool White + Neutral White. As you can see the Greens, Yellows and Reds are quite high than the Blues and Violets.
Cool White + Warm White. Compared to the last combination of Cool white + Neutral White, this has much lows of Blues and Purples.

Now see the combination of Cool White + Warm White + Royal Blue. The Blues and Violets are very high and Greens, Yellows and Reds are very low.

Now guess what would be the best spectrum for your planted tank!!
Yes! You’re right. The last one, because it has low Reds, Greens and Yellows and has high Blues.
The one I’m gonna build would also have the same combination of Cool whites, Warm whites and Royal Blues.
How to practically build a LED unit.
You would need-
• Heatsink
• LEDs
• LED optics
• Power supply drivers
• Fan for the heatsink (Optional)
• Dimmer/ Controller (Optional)
• Wire
• Solder cable
• Solder Iron
• Thermal Adhesive or thermal grease.
• 2 AA batteries to test the LEDs
Heatsink-
Prior to start telling you what it is, just see how it looks like-


It has a lot of fins or wings which makes its surface area way bigger than just of a solid piece or a plate of the same material. Generally Aluminum is used to make the Heatsinks. But now hard anodized heatsinks have also hit the market.
The black one shown above is hard anodized and the white one is just Aluminum heatsink.
There are 2 ways to mount LEDs on the heatsink-
- Thermal Adhesive- It’s like fevikwik. Just put a drop of it on the back of LED and paste it. But the joint is permanent. You won’t be able to remove or replace the LED.
- Screws and thermal grease- Drill the holes on the heatsink. Put some Thermal Grease on the back of LED and screw it down. We put the grease so that the heat from the LED can transfer to the heatsink already. Any air gaps could make your LEDs very hot and damage it.
Some people put fans on their heatsinks. How to know if you need a fan on your heatsink or not. Just touch your heatsink when the unit has been on since 2-3 hours. If you can touch it, you don’t need a fan. But if you can’t touch it, you need a fan.
LEDs-
LEDs have some characteristics. Like we buy our CFL bulbs by their wattage, we buy LEDs by their Forward Voltage and Maximum Drive Current.Like- A Cree XT-E Royal Blue LED has Forward Voltage of 3.0 V, wattage of 3W and Max Drive current of 1500mA.
It means the maximum current you can give to this LED is 1500 mA and when put in a series, after every LED you’d see a drop of 3 Volts in the Voltage.
LED Optics-
Most LEDs have a light angle of 120 degrees. Which means the light would spread in a cone of 120 degrees. So to concentrate the light over an area we would need some lens or optics. Optics are named according to their concentration capabilities - 20 Degrees, 40 Degrees, 60 Degrees, 80 Degrees.
Power Supply Drivers-
LEDs work on DC current. So the drivers convert our household AC current to DC to light up the LEDs. They are characterized by their Max Drive Current and total Wattage.
For eg. Inventronics 40w driver - 700mA. Its total wattage is 40 watts so it can light up around 12 LEDs of 3W each. We leave 4 W as a margin. The 700mA is the Max Drive Current. You can use 700mA driver to light up a LED which has Max Drive Current rating of 1500mA. But you cannot use 1500mA rated driver to light up the LED with 700mA Max Drive Current.
Now, Just to talk a bit more about the drivers, lets take a new LED which is more efficient than the previous XP-G or XT-E. Cree XM-L. It has Max. drive current of 3000mA. It's upto you how much light do you want from this LED. If you put 700mA driver, it will give low light, Gradually if you increase the input current from the driver, the light output will increse. Lets see it's graph-

Dimmer/ Controller-
Just like we have controller for our ceiling fans, you may put dimmer for your LED lights. These are nothing but potentiometers. Generally we use 10 ohm dimmer.
But if you want to go fancy (which I wanna go :D) there are sunrise sunset dimmers available. You may set the time when your LEDs will start lighting up from 0% and when they would go 100% and the same of 100% to 0%. A lot of options are coming in the market nowadays.
See the one I'm gonna use here- dimmer youtube video
Wires, Solder cables, and Solder Irons-
You all know what their uses are.
Before concluding the bibliography, I'd like to answer the question which still is buzzing in your mind(yes, I know it all ;) )- "How does a finishe LED light unit look like ?"
So, check this vid out and you will come to know- WIfe approved DIY LED unit
I’ve read this information in past months from the following links and I thank them all. Specially Milad from ledgroupbuy.com, Hoppy from TPT, redfishsc from TPT, the blondskeleton from TPT.
• http://www.plantedtank.net/forums/showthread.php?t=182365
• http://www.plantedtank.net/forums/showthread.php?t=136519
• http://www.plantedtank.net/forums/showthread.php?t=184368
• https://www.youtube.com/user/ledgroupbuy
• http://makersled.com/
• http://www.ledgroupbuy.com/
• http://www.rapidled.com/
Thank you for reading this. In case you see something wrong in here, please drop a comment and I'll update it.
The next blog I wrote after this blog can be found here-
Link on TPT
or
Link on Instructables.com